Using colors in P5.js
Method 1. You know my name…
There are many ways of telling a computer to draw a particular color. P5.js has a number of these built in. The simplest is to use the predefined colors like 'red' or 'blue'. Those keywords are predifined to create colors that we know as red or blue. There are also more exotic colors predefined like 'hotpink' or 'chartreuse'. Here’s a little sketch that makes the background the color of moccasins: background(moccasin). (My moccasins are a little darker I think, but you get the idea)
1
2
3
4
5
6

function setup() {
  canvas = createCanvas(100, 100);
  background('moccasin');
}
Method 2. It’s just gray out today
Before getting into colors, let’s just start with shades of gray. P5 can display 255 different grays easily, just pick a number between 0 and 255, and that will give you a corresponding gray. (0 is black, 255 is white) This little sketch continuously sets the background to a different shade of gray by using a sine function. The color of the text is set by the cosine, since we always want the text to be different than the background.
1
2
3
4
5
6
7
8
9
10
11

function setup() {
  canvas = createCanvas(100, 100);
  }
function draw() {
  background(abs(255*sin(frameCount*.01)));
  fill(abs(255*cos(frameCount*.01)));
  text(abs((255*sin(frameCount*.01))).toFixed(0),width/2,height/2);
}
Method 3. Roy G. Biv
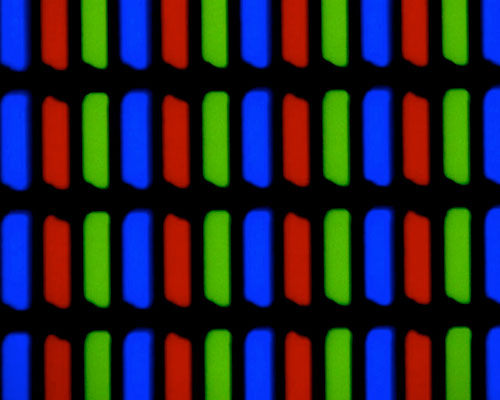
If you need finer control of things, and don’t want to be limited by the set of colors defined by some folks who don’t see the world like you do, then you can define your own color by setting the amount of Red, Green, and Blue that will be displayed. If you were to look at your monitor with a microscope (go ahead, do it!), you’d see a array of little rectangles that are either Red, Green, or Blue. The amount of each one determines what color the screen is showing.
So, by telling P5 to display a certain amount of Red, Green, and Blue, we can control the color. The range for each value usually is set between 0 and 255, which 255 being the most. This is the default format in P5 so if you write:
color(255,50,50)
this will create a color with mostly red, and a little green and blue in it.
1
2
3
4
5
6
7

function setup() {
  canvas = createCanvas(100, 100);
  c = color(255,50,50)
  background(c);
}
We can programmatically adjust the RGB values, depending on something, like a user input or position or whatever you want. For example, a slider could be used to adjust the red value.
1
2
3
4
5
6
7
8
9
10
11
12

function setup() {
  canvas = createCanvas(200, 100);
  aSlider = createSlider(0,255,255,1)
  aSlider.position(50,height/2)
  }
function draw() {
  c = color(aSlider.value(),50,50)
  background(c);
}
strings
We can also use strings (variables defined using quotes: 'string'), rather than numeric values to define the colors. The following two lines will do exactly the same thing:
c = color('rgb(0%, 0%, 100%)')
c = color(0,0,255)
1
2
3
4
5
6
7
8
9
10

function setup() {
  canvas = createCanvas(200, 100);
  }
function draw() {
  c = color('rgb(0%, 0%, 100%)');
  background(c);
}
Method 4. Other color schemes
The RGB color model is very useful and great for come applications. However, there are other ways to define a particular color, for example, using the Hue, Saturation, and Lightness, or HSL. Some rough definitions:
- Hue will set the basic color along the spectrum, from 0 to 360 where 0 is red, 180 is bluegreen, and 360 is back to red.
- Saturation ranges from 0 to 100% and determines how much color is in the presentation.
- Lightness also ranges from 0 to 100% and sets the brightness of the color shown.
The HSL model is useful when you want to keep the same hue (color), but change the other parameters, or smoothly range through a spectrum. Here’s a little wheel that shows the changing hue value
1
2
3
4
5
6
7
8
9
10
11
12
13
14
15

function setup() {
  canvas = createCanvas(300, 300);
  background(255);
  translate(width/2,height/2)
  for (i = 0; i<360; i++){
    c = color('hsl('+i+', 100%, 50%)');
    stroke(c)
    rotate(radians(1));
    line(30,0,70,0);
  }
}
Here are some lines that slowly change either the saturation or the lightness as a function of their position in the canvas. The upper half all have the same hue (blue) and saturation (100%), which the lines on the lower half have the same hue and lightness.
1
2
3
4
5
6
7
8
9
10
11
12
13
14
15

function setup() {
  canvas = createCanvas(300, 200);
  background(255);
  strokeWeight(4)
  for (i = 0; i<width; i+=10){
    c = color('hsl(200,100%,'+map(i,0,width,0,100)+'%)');
    stroke(c)
    line(i,0,i,height/2);
    c = color('hsl(200,'+map(i,0,width,0,100)+'%,50%)');
    stroke(c)
    line(i,height/2,i,height);
  }
}
This can be useful for suggesting two things, like lines in a graph, are related, but different.
Method 5. By wavelength
As physicists, we consider color to just be defined by the wavelength of the light. However, this takes a little more work to get a computer to display those colors properly.
The sketch below shoes a function getRGB() that takes a wavelength, in nanometers, and converts it to a RGB value, which can then be interpreted by p5. (Based on the work presented here)
1
2
3
4
5
6
7
8
9
10
11
12
13
14
15
16
17
18
19
20
21
22
23
24
25
26
27
28
29
30
31
32
33
34
35
36
37
38
39
40
41
42
43
44
45
46
47
48
49
50
51
52
53
54
55
56
57
58
59
60
61
62
63
64
65
66
67
68
69
70
71
72
73
74
75
76
77
78
79
80
81
82
83

// convert wavelength to RGB value
// based on http://www.efg2.com/Lab/ScienceAndEngineering/Spectra.htm

function setup() {
  createCanvas(380, 200);
  thecolor = getRGB(540);
  background(0);
  lambdaStart = 370;
  lambdaEnd = 750;
  for (i = lambdaStart;i<lambdaEnd;i++) {
    stroke(getRGB(i))
    line(0+i-lambdaStart,0,0+i-lambdaStart,height)
  }
  lambdaValue = createP('Wavelength = ')
  lambdaValue.position(width/2,height/2)
}

function draw() {
	lambdaValue.html('Wavelength = '+(mouseX+lambdaStart))
}


function getRGB(Wavelength) {

    if (Wavelength >= 380 && Wavelength<440)
    	{
        Red = -(Wavelength - 440) / (440 - 380);
        Green = 0.0;
        Blue = 1.0;
    	}
  		else if (Wavelength >= 440 && Wavelength<490)
      {
        Red = 0.0;
        Green = (Wavelength - 440) / (490 - 440);
        Blue = 1.0;
    	}
  		else if (Wavelength >= 490 && Wavelength<510)
      {
        Red = 0.0;
        Green = 1.0;
        Blue = -(Wavelength - 510) / (510 - 490);
  	  }
  		else if (Wavelength >= 510 && Wavelength<580)
      {
        Red = (Wavelength - 510) / (580 - 510);
        Green = 1.0;
        Blue = 0.0;
  	  }
  		else if(Wavelength >= 580 && Wavelength<645)
      {

        Red = 1.0;
        Green = -(Wavelength - 645) / (645 - 580);
        Blue = 0.0;
    	}
  		else if (Wavelength >= 645 && Wavelength<781)
      {
        Red = 1.0;
        Green = 0.0;
        Blue = 0.0;
    	}
  		else{

        Red = 0.0;
        Green = 0.0;
        Blue = 0.0;
    	};

    // Let the intensity fall off near the vision limits

    if((Wavelength >= 380) && (Wavelength<420)){
        factor = 0.3 + 0.7*(Wavelength - 380) / (420 - 380);
    }else if((Wavelength >= 420) && (Wavelength<701)){
        factor = 1.0;
    }else if((Wavelength >= 701) && (Wavelength<781)){
        factor = 0.3 + 0.7*(780 - Wavelength) / (780 - 700);
    }else{
        factor = 0.0;
    };
  return c = color(Red*255*factor,Green*255*factor,Blue*255*factor)
}
This can be useful for creating sims about the spectrum of visible light, or lasers, or anything involving the physics of electromagnetic radiation in the visible region.
Summary
It wouldn’t be fair to say this article even scratches the surface of color theory. How we perceive and describe colors is a fascinatingly huge topic about which much has been written. The poet/natural philosopher Goethe has a great book on the topic: The Theory of Colors. As does Newton, Opticks, or, A Treatise of the Reflexions, Refractions, Inflexions and Colours of Light. Modern treatments are more accurate with regard to the physics and biophysics of color perception. But, here we are just concerned with how to get p5.js to display the colors we want. So, our job is easy, and by and large done! Bye.